EMPIAR-10146 Tutorial
- Time requirement: 10- 30 minutes | 7 Jobs
- Goal: Get a quick start on how CryoCloud works and determine a 3.5 angstrom structure of Apoferritin
This tutorial will walk you through the analysis of the EMPIAR dataset 10146 containing Apoferritin. When you sign up for CryoCloud, the dataset EMPIAR-10146 will have been automatically linked for you.
Creating a project
To start, you need to create a new project.
Navigate to the Project view by clicking on the Project tab in the left sidebar.
Create a new Project by clicking on the button.
Enter a name and specify the type (SPA for this tutorial).

Press the button, which will create the project and then take you to the project grid.
Linking a dataset
To run any type of analysis in a CryoCloud project, you need to link a dataset to your project.
Click on the button to the top left of the project grid, which will open a "Linked datasets" view to the right.
Click on the button.
Select the "EMPIAR-10146" dataset

Click on the button.
Pre-processing
This section focuses on the jobs you can run in the pre-processing column.
Motion Correction
To run any type of analysis in a CryoCloud project, you need to link a dataset to your project.
Click on the "+" tile in the "Pre-Processing" column

The job type (Motion Correction) and the linked dataset will be pre-selected in the dropdowns. Confirm the selection by clicking on , which will open the Job setup form.

Set the following parameters:
Input movies STAR file:datasets/<N>/movies.star(pre-populated from the linked dataset)'Number of patches X:3Number of patches Y:3
 Datasets
In your future analyses, there is no need to run a separate Import Job. The .star files will be automatically created when a movie dataset is uploaded and a snapshot is generated.
The linked dataset also does not contain a gain reference, so you don't need to specify one. But keep in mind to specify one for your other datasets. If you link a gain reference to your dataset during upload, the field for the gain reference in the Motion Correction job will already be correctly pre-filled.
Click on the and buttons to run the job.
CTF Estimation
You can queue a job to a running job or a job draft. Simply click on the "+" sign on the top right of a job tile. After setting up and submitting the job, its status will be shown as queued and it will automatically start when the previous job has finished.
After submitting the MotionCor job, you can go back to the project overview page and set up and queue the next CTF Estimation job. There is no need to wait for the previous job to be finished.
Click on the "+" in the top right corner of the Motion Correction, which will open the job creation dialog.
Set the type to "CTF Estimation" and the input source to the job with the MotionCor that you created previously.
Press the button, which will open the job setup page.
For this job, you can keep all default parameters. Click on the button to run the job.
Once the job is started, it should take about 3 seconds to run. After it is completed, the results page will open automatically. Inspect the results.
The Max Resolution (Å) plot should show that most micrographs have a maximum resolution of 4-4.5 Å. If there were outliers with considerably worse resolution you could run a Selection job and set a cutoff for CTF Max Resolution. However, this is not required for this dataset.
Tutorial stepsFrom now on, the tutorial will abbreviate job creation, setup and execution into a single step.
Particle Picking
Set up an "Particle Picking" job off of the "CTF Estimation" with the following parameters:
Input micrographs for autopick:jobs/CtfFind/<N>/micrographs_ctf.star(from CTF Estimation job)Compute ideal - Min. diameter for LoG filter?:NoMin. diameter for LoG filter (A):100Compute ideal - Max. diameter for LoG filter?:NoMax. diameter for LoG filter (A):160
Click on the and buttons to run the job.
When the job finishes, inspect the results.
Extract Particles
To analyze your picked particles you need to extract them first.
Set up an "Extract Particles" job off of the "Particle Picking" with the following parameters:
Micrograph STAR file:jobs/CtfFind/<N>/micrographs_ctf.star(from CTF Estimation job)Compute ideal - Particle box size?:NoParticle box size (pix):180Rescale particles:No
Click on the and buttons to run the job.
Class2D
This section focuses on the jobs you can run in the Class2D column.
2D Classification
For this job, we will use Relion's VDAM algorithm with 200 iterations. This is the default setting in both Relion4 and CryoCloud.
Set up a "2D Classification" job off of the "Extract Particles" with the following parameters:
Input images STAR file:jobs/Extract/<N>/particles.star, whereNis the previous job's number and is set automatically.Number of classes:20Number of VDAM mini batches:200Compute ideal - Mask diameter?:NoMask diameter:160
Click on the and buttons to run the job.
Select
Set up a "Select" job off of the "2D Classification" with the following parameters:
Select classes from model.star:jobs/Class2D/<N>/run_it200_model.star, whereNis the previous job's number and is set automatically.
Click on the button to load the 2D class averages.
If you used all the settings from this tutorial, the selection should result in roughly 2,300 particles, which can be seen to the right of the class grid.
Select the correct classes.
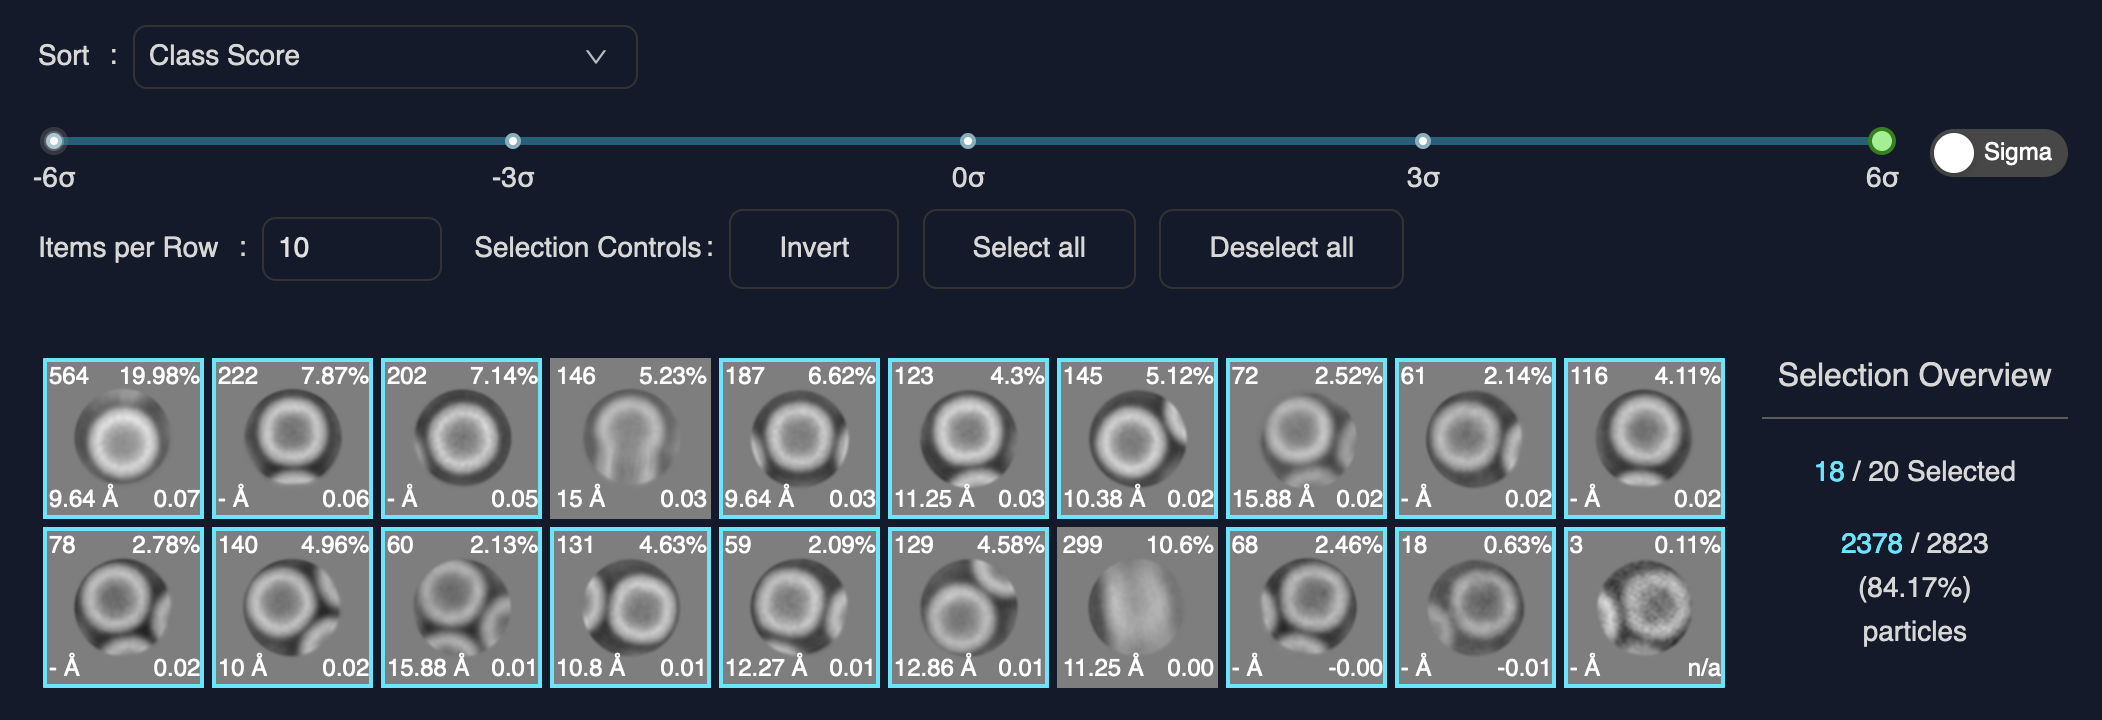
- Click on the and buttons to run the job.
Refine3D
This section focuses on the jobs you can run in the Refine3D column.
Uploading a reference map
Before we go to the last job of 3D refinement, you need to upload a reference map to your project.
In CryoCloud, all references, masks and other auxiliary files can be uploaded to the Project's Archive . You can use these files as input for jobs that require external data (masks, references, high resolution maps for model building).
In the Project Overview, click on the button, which will open an "Archive" Side Panel.
Download the following reference and mask files:
The reference was generated by rescaling and resizing the map EMD-24797 to 1.5 Angstrom and a box shape of 180 voxels in each dimension. So it will have the correct dimensions for this tutorial.
Upload the files to the project's archive by clicking on "Upload file" on the Side Panel and selecting each file.
3D Refinement
Set up a "3D Refinement" job off of the "Select" with the following parameters:
Input images STAR file:jobs/Select/<N>/particles.star, whereNis the previous job's number and is set automatically.Reference map:archive/<downloaded-reference.mrc>Reference mask:archive/<downloaded-mask.mrcInitial low-pass filter:8Symmetry:O(the letter 'oh', not zero!)Mask Diameter:160Use solvent-flattened FSCs:YesTrust Reference pixel size?:Yes
Click on the and buttons to run the job.
The 3D refinement should finish in about 6 minutes and result in a 3.5 Angstrom resolution map.
Next Steps
Feel free to download the resulting map from the "Refine3D" job, create a mask using the "Mask create" job from "Refine3D" column and run a "Post-Processing" job from the "Post-Processing" column. Note that both jobs need to be run on top of the "Refine 3D" job.
You can even run polishing and CTF refinement jobs with the available data, even though the resolution of this dataset will be limited by the movie pixel size of 1.5 Angstrom.
If you have any input or questions during the tutorial, let us know via the in-app messenger or an email to hi@cryocloud.io.